General features
Identification data
Instruments and controls
Riding your motorcycle
Break-in
Maintenance and adjustments
Wheel removal
Service schedule
Cleaning - Storing
Cleaning the windscreen
Lubrication
Valve gear
WEBER injectionignition
system (I.A.W.)
Electrical equipment
Wiring diagram
Illustrations
Engine
Timing system
- SPORT 1100
Timing system
- DAYTONA RS
Fuel system
Exhaust system
Lubrication
Generator/Alternator
Ignition
Starting
Driveline data
Frame
Suspensions
Performance
(The data in parenthesis apply to model DAYTONA RS only)
Engine
4-stroke, twin cylinder
Cylinder configuration: 90* V-twin
Bore: 92 mm [90]
Stroke: 80 mm [78]
Displacement: 1064 cc [992]
Compression ratio: 9,51 [10,5:1]
Max. torque: 95 Nm (9,7 kgm) at 6000 rpm
[88 Nm (9,0 kgm) at 7800 rpm]
Max. power: 66 KW (90 CV) at 7800 rpm
[75 KW (102 CV) at 8400 rpm]
With rods and rockers and 2 valves per cylinder. One camshaft in the crankcase driven by duplex chain with automatic chain tensioner.
[Overhead camshaft with 4 valves per cylinder. Straighttooth gear control, in light alloy and positive drive belt.]
Fuel system
Indirect electronic injection Weber Marelli of the pulsed sequential
type, "Alfa-N" system, 2 injectors, electric pump with pressure regulator,
optimized digital control of injection timing, high-performance air filter
with 2 air vents.
Exhaust system
In stainless steel - 2 pipes connected to an expansion chamber and
two silencers.
Lubrication
Pressure fed by gear pump.
Oil filters: wire mesh inside sump and replaceable
cartridge filter outside sump.
Normal lubrication pressure 3.8Ö 4.2 [5] kg/cm2, pres-
sure valve, thermostat and cooler.
Low oil pressure sensor (electrical) on crankcase.
Generator/Alternator
On front of crankshaft (1 4V - 25A).
Ignition
"WEBER MARELLI" electronic digital induced discharge, with high efficiency
coil. Spark plugs:
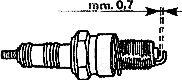
Spark plug gap: 0,7 mm.
SPORT 1100 DAYTONA R
NGK BPR 6 ESI NGK DR9 E IMS
Starting
Electric starter (12V-1,2 kW) with solenoid engagement. Ring gear bolted
on flywheel. Starter button (START) on right of handlebars.
Driveline data
Clutch
Twin driven plates, dry type, on flywheel. Hand controlled by lever
on left of handlebars.
Primary drive By gears. Ratio: 1 to 1.3529 (tooth ratio 17/23).
Gearbox
5-speed, with constantly meshed gears with front dog clutch. Incorporated
cush drive. Pedal operated on the left side of the motorcycle.
Gear ratios:
Low gear = 1 to 1,812 (tooth ratio 16/29)
2nd gear = 1 to 1,250 (tooth ratio 20/25)
3rd gear = 1 to 1 (tooth ratio 23/23)
4th gear = 1 to 0,833 (tooth ratio 24/20)
5th gear = 1 to 0,730 (tooth ratio 26/19)
Final drive
Shaft with double universal joint and floating bevel gearcase with
counteracting system on drive wheel silent-block.
Ratio: 1:4,125 (tooth ratio 8/33)
Overall gear ratios (Engine-wheel):
Low gear = 1 to 10,1150
2nd gear = 1 to 6,9761
3rd gear = I to 5,5809
4th gear = 1 to 4,6507
5th gear = 1 to 4,0783
Rectangular section single-beam in NiCrMo steel. Semisupporting engine base.
Front: White Power upside-down hydraulic telescopic fork with individually
adjustable rebound and compression;
Rear: steel swing arm with oval cross section. Single shock absorber
White Power with separate adjustment of spring preload and of hydraulic
rebound and compression damping.
Wheels
Light alloy castings with 3 hollow spokes (rear wheel with cush drive
unit). Rim sizes:
- front: 3,50x 17 MT H2
- rear: 4,50x17 MT H2
Tires
-front: 120/70 ZR 17
- rear: 160/70 ZR 17 [160/60 ZR 17]
Type: Tubeless
Front: two Brembo drilled semi-floating disc brakes in stainless steel for SPORT I 100; [two Brembo drilled floating discs, Racing type for DAYTONA RS] with fixed 4 differential piston calipers. Adjustable manual control lever on the right side of the handle-bar;
- disc 320 mm;
- brake cylinder 34/30 mm; - 0 master cylinder 16 mm.
Rear: stainless steel fixed disc brake with fixed double braking cylinder caliper. Brake pedal on centre-right of
motorbike;
- disc 282 mm;
- brake cylinder 32 mm;
- master cylinder 11 mm.
Dimensions and weight
Wheelbase m 1,475
Overall length m 2,125
Overall width m 0,720
Height m 1,125
Ground clearance m 0, 160 [0,150]
Weight (dry) kg 221 [223]
Performance
Max. speed with one rider: over 230 [240] km/h.
Fuel consumption for both models: 4.5 It/I 00 km (CUNA).
Refuelings
Description Quantity Recommended products
Fuel tank 19 l Supergrade petrol (97 NO RM/min.)
(reserve 5 1 about) about Unleaded Patrol (95 NO-RM/min.)
Crankcase sump about
3,5001 <<Agip 4T Super Racing SAE 20W50>> oil
Gearbox 0,7501 <<Agip Rotra MP SAE 80 W/90>> oil
Rear drive box 0,250 Total of which:
(crown wheel) 0,230 <<Agip Rotra MP SAE 80 W/90>> oil
(pinion) 0,020 <<Agip Rocol ASO/R>> oil or
<<Molykote type A>>
Front fork (each leg) about
0,400 1 <<WP suspension-REZ 71 (SAE 5)>>
cartridge oil
Braking system (front and rear) <<Agip Brake Fluid - DOT 4>>
fluid
Every motorcycle is stamped with identification numbers on the tubular frame and on the crankcase. The frame number is written in the motorcycle logbook and is the vehicle's legal identification.
Spare Parts
Only 0riginal MOTO GUZZI Spare Parts should be used. The use of non-original
parts invalidates the warranty.
1. Key switch for devices and steering lock.
Position OFF vehicle stationary.
Key removable (no contact).
Position ON vehicle ready to be started.
All circuits are on.
Key not removable.
Position LOCK contact
key removable.
Position P steering locked
Engine off;
with switch <<A>> of fig. 4 in position, the
parking light is on.
Key removable.
In order to use the steering lock mechanism, proceed as follows:
Turn the handlebars to the left.
Press the key downwards and release it, then turn it in an anticlockwise direction to the LOCK or P position.
WARNING: Never turn the key to position LOCK or P when the engine is running.
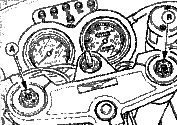
2. Odometer, tachometer.
3. Rev counter.
4. Pilot light (green) <<Neutral>> Lights up when the gearbox is in neutral.
5. Pilot light (red) for generator current output. Should go out when
the
engine reaches a certain number of revs.
6. Petrol tank reserve pilot light (orange).
7. Pilot light (green) for flashing indicators.
8. Oil pressure pilot light (red). Goes out when the oil pressure is
sufficient
to ensure engine lubrication.
9. Pilot light (blue) for main beam.
10. Partial rev counter zeroing.
Light switches (fig. 4)
Are fitted to the sides of the handle-bars.
Switch <<A>>
Position <<¥>> lights off.
Position parking lights on.
Position twin-filament headlamp on.
Switch <<B>>
With Switch <<A>> in position
Position<<>> dipped beam.
Position <<>> main beam.
Switch, hazard warning lights
(<<H>> of fig. 4)
It is installed on the left hand side of the fairing and turns on both
flashers at the same time.
Horn Button, Headlamp Flash direction indicators (fig. 4)
These are mounted on the left handlebar: Push-button E sounds the electric pressed. Push-button C flashing light control. Push-button <<D>>
Position for right turn signals control
Position for left turn signals control.
Press the switch to disconnect flashers.
<<Choke,) control (<<F>> in fig. 4)
The -CHOKE* is on the left handlebar and cold starts.
Position , I 1>> CHOKE on; starting position
Position <<2>> CHOKE off; engine running
Clutch lever (<<G>> in fig. 4)
This is on the left handlebar and is only to be starting or changing
gear.
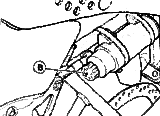
Starter Button and Engine Switch (fig. 5)
These are mounted on the right handlebar.
With the key <<1>> in fig. 3 in position ON the
vehicle is ready for starting.
To start the engine:
check that switch ,B,, is in position (run);
pull the clutch lever in to disengage the clutch fully;
if the engine is cold, put the <<CHOKE>> control <F>>
in the starting position <<1>> (see fig. 4).
0 press the starter button A (start).
To stop the engine in case of emergency:
turn the switch ,B>> to position (off).
Once the engine has stopped, turn the key switch (fig.
3) in position OFF remove the key from the switch.
Throttle twist grip (<<C>> in fig. 5)
The throttle control is on the right handlebar; turning the
twist-grip towards the rider opens the throttle, turning it
away from the rider closes it.
Brake lever, front brake (<<D>> in fig. 5)
This is on the right handlebar and controls the master
a cylinder of the front brake.
Brake pedal for rear brake (<<A>> in fig. 17)
This is centrally located on the right side of the vehicle and is linked to the rear brake master cylinder by a tierod.
Gearbox control pedal (fig. 6)
This is situated on the left of the motorcycle:
1st gear: push pedal down;
2nd, 3rd, 4th, 5th gears: pull pedal up;
neutral: between 1st and 2nd gears.
Before changing gear disengage the clutch fully.
To open the filler cap, turn the key clockwise.
N.B. - Fuel spillage caused during refuelling should be cleaned immediately
to prevent damage to the fuel tank paintwork.
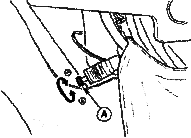
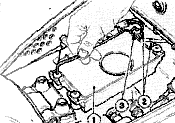
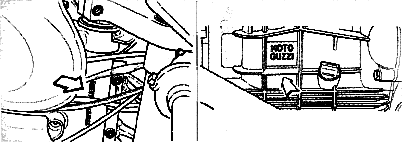
The motor vehicle is fitted with a motor-driven pump that regulates the fuel flow from the tank to the engine. If the petrol tank has to be removed, before disconnecting the pipes the tap <<A>> on the bottom of the tank on the rear left-hand side must be tightly closed. Approximately every 10000 km, clean the net filter on the tap.
Situated on the rear right-hand side of the motorbike;
remove the passenger seat to access to it (see fig. 11).
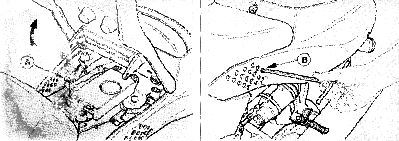
The fuse box has 6 <<15 15 Amp,, fuses; their functions are
indicated by the decal on the cover.
Before changing a burnt fuse, trace and repair the
cause of the trouble.
Fuse <<1>> fuel pump, coils, electric injectors.
Fuse <<2>> electronic box.
Fuse <<3>> emergency flashers.
Fuse <<4>> driving beam, traffic beam, passing light,
horns, front lever stop light, rear pedal stop light, starting
motor.
Fuse <<5>> tail light, dashboard lights, instruments lighting.
Fuse <<6>> blinkers intermittence.
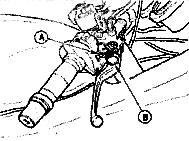
This is fitted on the front part of the motorbike between the frame
and the steering base.
To increase or reduce the braking effect, screw or unscrew the knob
<<a>>
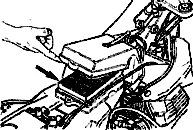
Documents and objects holder (<<A>>) in (fig. 11)
It is located in the motorcycle rear side; to reach it, remove the passenger
seat by releasing the lock <<B>> the same key of the ignition switch.
The helmet can be left with the motorcycle, using the helmet holder with lock <<A>>.
N.B. - never leave the helmet in the holder when the motorcycle is running, as it may interfere with the moving parts.
Motorbike lateral supporting arm (<<A>>) in (fig. 13)
The motorbike is equipped with an arm that serves as a lateral support during parking; when the motorbike is moved to an upright position the lateral arm automatically returns to the rest position.
To remove the seat from the chassis use a 6 mm Allen wrench to unscrew, from both sides, the screw-pins <<A>> which can be reached through the holes <<B>> made on the tail side.
Note: It is not necessary to completely unscrew the screws, just loosen
them as required to remove the seat.
Preliminary checks Check: that there is sufficient fuel in the tank; that the engine oil is on the right level; the ignition key is in position ON ,0,, (see fig. 3); that the following warning lights are on: red warning lights: oil pressure and generator; green warning light: <<NEUTRAL>> indicator; that the <<CHOKE>> control lever is in the starting position (if the engine is cold) (<< 1 1>> fig. 4); that switch <<B>> (fig. 5) is in position (run).
Cold starting
After making the above checks, engage the clutch and press the button
(A ,(7). in fig. 5). Once the engine has started, and before puffing the
,,CHOKE- lever back to its normal running position (,,2,, in fig. 4), allow
the engine to idle for a few seconds in summer or a few minutes in winter.
ATTENTION! If the <<green>> warning light does not come on when the ignition switch is on (see ON in fig. 3) this means that a gear is engaged; starting the vehicle in this condition could be dangerous.
Before starting, always check that the engine is in <<neutral>>.
Warm start
Follow the same procedure as that for the cold start but without the
"CHOKE* control in the start position (<< 1>>, fig. 4).
ATTENTION I !- The starter motor should not be operated for more than
5 seconds; if the engine doesn't start, wait for 10 seconds before the
following starting operation. Anyway act on the starter button A in fig.
6 only with the engine completely stopped.
On the way
To change gear, shut the throttle, disengage the clutch fully and engage
the next gear; then engage the clutch gradually while opening the throttle.
The gear change pedal should be operated firmly and surely.
When changing down use the brakes gradually and close the throttle gradually to avoid over-revving the engine, when releasing the clutch lever.
Stopping the motorcycle
Close the throttle and use the brakes; just as the vehicle is about
to stop disengage the clutch. These three operations should be carefully
coordinated to maintain full control of the vehicle.
When slowing down in normal conditions, use the gearbox to provide engine
braking to slow the vehicle; take care not to over-revving the engine.
Use the brakes (especially the front brake) with particular care when roads
are slippery or wet.
To stop the engine, turn the ignition switch till the position OFF
(see fig. 3).
Parking
On badly lit roads, leave the parking lights on.
Turn the key switch to position P (see figure 3),
and the light switch <<A>> in fig. 4 to position . and
remove the key from the switch.
During the break-in period follow the rules below: before moving off, allow the engine to warm up by idling for a while, the time depending upon the temperature; avoid exceeding the break-in speeds shown in the table below, bearing in mind that whilst observing these limits, it is good practice not to ride at a constant speed, but to vary it often; before stopping, decelerate gradually, to avoid subjecting the engine components to abrupt temperature changes; bear in mind that complete bedding-in of the components, which will allow full and long lasting enjoyment of the motorcycle, is achieved only after several thousands of miles.
After the first 500+1500 km Change the engine oil. Should the oil level drop to the minimum level before the first 500+1500 kilometers have been completed then carry out a complete oil change rather than just topping up. Recommended oil: <<Agip 4T Super Racing SAE 20W/50)). Replace gear lubrication oil. Replace transmission box lubrication oil. Check that all nuts and bolts are tight. Check rocker clearance. Check tire pressures.
BREAK-IN
Kilometers Max. RPM
From 0 to 1000 5000
From 1000 to 2000 6000
From 2000 to 4000 Gradually increase rpm until maximum
permissible is reached.
MAINTENANCE
AND ADJUSTMENTS
Adjusting
the clutch lever
Adjusting
the front brake lever
Rear
brake pedal adjustment
Checking
brake pads wear
Checking
brake disks
Front
brake reservoir
Rear
brake reservoir
Adjustment
of telescopic fork
Rear
suspension adjustment
Accessing
the rear shock adjuster
Rear
shock ring nut
Rear
shock hydraulic damper
Rear
shock spring pre-loading
Max.
allowed load
Adjusting
the steering
Front wheel
Rear
wheel removal
Joint
unit position diagram
Engine
lubrication
Oil drain
plug
Washing
the wire mesh filter
Gearbox
lubrication
Rear
transmission box lubrication
Greasing
the driving shaft
Valve
clearance
Adjusting
the CO and the idle setting
Changing
the fuel filter
Changing
the air filter
Spark plugs
Headlight
Rear light
Adjusting
the headlight beam
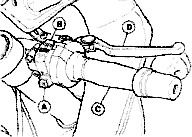
Adjusting the clutch lever (fig. 15)
There should be 3÷4 mm of tree play at the lever turn the adjuster screw, <<A>> to obtain the desired play Play can also be. adjusted on the cable adjuster <BB> on the right side of the gearbox. First loosen the
lock nut <<C>> and then adjust. The distance of the handle lever can be adjusted by turning ring nut <<D>> which has 4 positions.
Adjusting the front brake lever (fig. 16)
There should be a certain clearance between the pump float and the tip of the control lever. This play can be adjusted by turning adjustment screw ,A,,. The distance of the handle lever can be adjusted by turning ring nut 413which has 4 positions.
Rear brake pedal adjustment (fig. 17)
Check that brake pedal <<A>> has an idle stroke of approx. 5Ö 10mm. before the end of rod <<B>> comes into contact with the brake pump master cylinder; otherwise alter the length of rod <<B>> by tightening or untightening it after having loosened off lock nut ,C,,.
To change the position of the pedal -A,,, loosen the screw <<D>>
and adjust the cam <<E>> at the same time vary the length of the
rod <<B>> until the correct clearance is obtained.
Check the thickness of the brake pads every 3000 km: Wear limit 1.5 mm.
If the pads are below the wear limit they should be changed.
There is no need to bleed the brakes when the new pads have just been fitted; pumping the brake lever a few times will return the caliper pistons to their normal position.
When changing the pads, also check the flexible hoses; if damaged they should be replaced immediately.
N.B. - Use the brakes with moderation for the first 100 km after fitting new brake pads, to allow the pads to get properly bedded in.
The brake disks must be perfectly clean, with no oil, grease or other dirt on them. They should also show no signs of scoring.
The torque wrench setting of the screws that fix the disk to the hubs is 2,8÷3 kgm.
Checking the brake fluid in the master cylinder reservoir
Front brake reservoir (fig. 18)
Rear brake reservoir (fig. 19)
To ensure efficient operation of the brakes:
1 Make frequent checks of the fluid level in the front <<A>> in fig. 18 and rear <<B>> in fig. 19 reservoirs.
The level should always be above the minimum mark on the reservoirs.
2 Top up the brake fluid when necessary or at regular intervals. Only use recommended brake fluid in sealed containers for topping up.
Fluid containers should only be unsealed immediately before they are about to be used. 3 The fluid in the brake reservoirs should be changed completely after about every 15,000 km, or at least once a year.
To ensure efficient braking there should be no air bubbles in the brake circuit; if the brake lever has too much travel or a spongy action, this means that there are bubbles in the brake circuit.
When flushing the Brake circuits, only use fresh brake fluid.
Never use alcohol for flushing or compressed air for drying; we recommend the use of <<trichloroethylene>> for metal parts. Never use mineral oils or greases for lubricating parts. If no suitable lubricant is available, we recommend the light greasing of the rubber and metal parts with brake fluid. Recommended fluid <<Agip Brake Fluid DOT 4>>.
These operations are best carried out by an authorized dealer.
Adjustment of telescopic fork (fig. 20)
The motorbike is fitted with an hydraulic telescopic fork with separate adjustment of the rebound damping and compression damping.
Hydraulic damping can be adjusted turning adjuster screws <<A>> and <<B>> with a screw driver.
The left-hand adjuster screw <<A>> adjusts hydraulic rebound damping, the right-hand screw <<B>> if for compression damping.
Both adjuster screws have several settings (clicks); turning clockwise (+) you will get a stiffer damping, turning anticlockwise (-) will give a softer damping.
NOTE: Do not try to turn the adjusters screws further than their limit
positions.
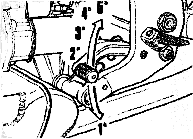
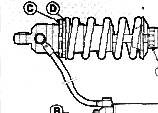
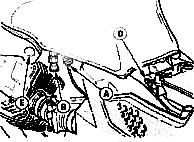
Rear suspension adjustment (fig. 21-22-23 and 24)
Accessing the rear shock adjuster (fig. 21)
The motorcycle is equipped with "WHITE POWER" single shock absorbers with separate adjustment of the springs pre-loading and the rebound damping and compression damping.
The shock absorber is calibrated in the factory to the following standard values:
REBOUND: position 5 (ring nut A)
COMPRESSION: position 4 (knob B)
SPRING PRELOADING: 14 mm
Use the adjusting ring nut <<A>> shown in fig. 22 to adjust the rebound damping. Access to the ring nut is obtained by removing the rider seat (see paragraph <<Removal of rider seat>> page 50) and the computer box <<1>> shown in fig. 21.
According to needs and the load on the motorcycle, the damper can be set from position "1" (very soft) to position "11 " (very hard).
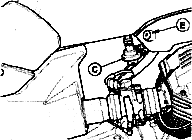
Rear shock hydraulic damper (fig. 23)
The hydraulic damper in compression can be set by turning adjusting knob,, <<B>> in fig. 23 that has 7 settings; from position "1" minimum damping, to position "7" maximum damping.
Rear shock spring pre-loading (fig. 24)
To adjust the pre-loading of the spring, using the correct wrench, loosen off ringnut <<C>> and adjust ringnut <<D>> tightening up increases the spring pre-loading (see fig. 24).
The spring preload, starting from a completely released spring, is 10 to 18 mm.
The released spring length is 165 mm.
N.B. - To avoid damaging the thread between the damper body and the ring nut <<D>> lubricated the thread with <<SVITOL>>, with oil or with grease.
ATTENTION - When refitting the electronic box, do not forget to re-connect the terminals of the ground wires <<2>> under the fastening screw <<3>> of the electronic box (see fig. 21 and 22).
The non observance of the requirements for tires pressure or load limits can affect the handling, operation and control of the motorcycle. The max. allowed weight supported by this motorcycle is 180 kgs (passengers + luggage + accessories = 180 kgs).
Adjusting the steering (fig. 25)
To ensure safe riding, the steering should be adjusted in such a way as to allow free movement of the handlebars without any play. 0 loosen the steering head fixing bolt ,A,,; 0 undo the steering head nut <<B>> 2 turn the adjuster nut ,C- to take up any play. When the play has been adjusted, tighten nut <<B>> and the steering head fixing bolt A,,. These operations are best carried out by an authorized dealer.
To remove the wheel proceed as follows:
place a support under the bottom of the engine to raise the front wheel
off the ground; undo screws <<A>> that secure the brake calipers
to the fork, and remove the cafipers <<B>> together with their hoses;
unscrew the ring nut <<C>> that secures the wheel spindle using a
suitable wrench; loosen the screws ,D,> that fasten the legs to the spindle;
remove <<E>> and note the assembly position
Extract pin <<C>> from the box, from the hub and from the fork arm; unscrew the setscrew-pin <<E>> for the caliper-holder disk ,D>>; remove the plate ,D>> complete with caliper; remove the wheel from the fork arm and the transmission box.
The drive box is kept in position on the fork by 13 means of a proper inside spacer; anyway, absolutely prevent the detached driving box weight from stressing the couplings on the end-of-stroke angular position, as they could be damaged.
To refit the wheel, proceed in reverse order, remembering to insert the disk with the caliper on the wheel pin and on the retainer of the floating fork L.H. arm.
If the reduction bush <<F>> does exit out of its seat on the fork, it has to be assembled with the smallest hole facing inside.
The torque of the screw <<A>> is 12 Kgm.
Tires
Tires are among those machine components which
require regular checking.
Machine stability, rider comfort and safety all depend on
good tire condition.
Do not use tires with less than 2 mm of tread.
Incorrect tire pressures can cause instability and ex-
cessive tire wear.
Tyre pressures:
front wheel: with one or two riders 2.2 BAR;
rear wheel: with one rider 2.4 BAR; with two riders
2.6 BAR.
These pressures are for normal touring use For continuous high speed
cruising (e.g. on' motorways) the above pressures should be increased by
0.1 BAR.
2,2bar=31.9lbs.sq in
2.4bar=34.8 lbs/sq in
2.6bar=37.7 lbs/sqin
Tire fitting
This machine is fitted with cast, light alloy rims; even though these
are very strong they can be damaged both aesthetically and mechanically
by the use of incorrect tools when removing and fitting tires. Tyre levers
should not have sharp edges or ribbing in those places where they come
into contact with the rim; lever contact surfaces should be smooth and
edges should be rounded.
Use of a suitable commercially available lubricant facilitates tire removal and fitting therefore making strenuous use of the levers unnecessary. It is important to ensure that the tire beads settle properly into the center rim groove.
Some tires have an arrow moulded on the sidewall, in these cases the tires should be fitted as follows:
rear wheel: arrow pointing in the direction of rotation; front wheel: arrow pointing against the direction of rotation.
N.B. - These instructions should be followed unless otherwise directed by the tire manufacturer.
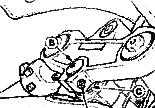
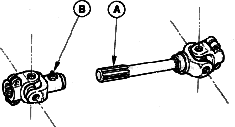
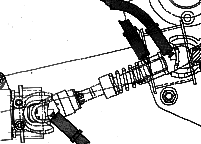
Joint unit position diagram (fig. 28)
ATTENTION I - In order not to damage the drive shaft - joint unit, if the unit is replaced, If dismantled, the shaft <<A>> and the joint <<B>> must be refitted in the position indicated In the figure.
PICTURE
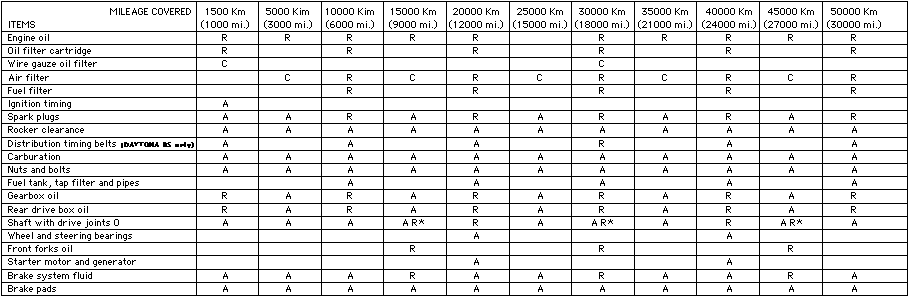
A = maintenance - Inspection - Adjustment - Possible replacement/ C
= Cleaning./ R = Replacement.
Occasionally lubricate the rear suspension joints of the controls and the flexible cables, every 500 km check the oil level In the engine The engine all, the front fork oil and the brake fluid must be changed at least once a year.
Grease every 2500 kms (every 1000 kms In case of continuous usage at high speed) or at least once a year if the number of kilometers Is lower.
In the event of mainly sporting use or regular high speed travel, replace every 15,000 Ion.
Cleaning
Preparations for washing
Before washing the vehicle, the following parts should be covered with
a waterproof material: the rear part of the silencers, the clutch and brake
levers and pedals, the throttle twist-grip, the left-hand light switch,
the ignition key switch, the shaft with driving couplings and the electronic
box.
NOTE: The electronic box is located under the rider seat.
Washing
Avoid spraying water too much pressure on the instruments and the front
and rear hubs.
Do not clean the joints with high-pressure water or with solvents.
Drying
Remove the protective coverings. Thoroughly dry the vehicle.
Test the brakes before using the vehicle.
It is recommended to grease the shaft with driving couplings (see page
124, fig. 33).
N.B. - To clean the painted parts of the engine unit (engine, gearbox, transmission box, etc.) the following products may be used: diesel oil, petrol or water-based neutral detergents for car cleaning. These products should be washed off immediately with water; do not use water at high temperatures or pressures.
Storage
If the vehicle is to remain idle for a considerable period
of time (e.g. for the winter period) it should be stored in
the following way:
clean the vehicle thoroughly;
empty the fuel tank and feeding system. If left for a
long time, the fuel will evaporate leaving incrustation
and residue;
remove the spark plugs and put a few drops of SAE
30 oil into the cylinder. Turn the crankshaft for a few
revolutions and then replace the spark plugs;
reduce the tire pressures by 20%;
position the vehicle so that its wheels are not touch-
ing the ground;
smear a layer of oil on unpainted parts to prevent
rust;
remove the battery and store in a dry place away
from the direct sunlight and where there is not danger of
frost; check the battery charge once a month;
cover the vehicle but in such a way that the air can
circulate.
The windscreen can be cleaned using most of the soaps, cleaners, waxes and polishes commercially available for glass and plastic.
The following precautions should be taken:
do not wash or polish the windscreen indirect or strong sunlight or
when temperatures are high;
under no circumstances use solvents, lyes or similar products;
do not use abrasive substances, pumice, sand/ emery paper, files, etc.;
wash all dust and dirt away before polishing. Small superficial, scratches
can be removed using a mild polish;
paint or sealing compound can be removed before harden by using diesel,
isopropyl alcohol or butyl cellosolvent (do not use methyl alcohol);
use soft cloths, sponges, chamois leathers or cotton wool; do not rub
too hard. Do not use paper towels or man-made fibre cloths as they tend
to scratch the windscreen.
Deep scratches cannot be removed by hard rubbing or the use of solvents.
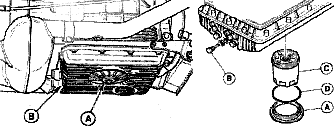
Checking the oil level Check the crankcase oil level every 500 km; the oil should reach the Wax,, mark of the dipstick <<A>> If the oil is below this level, top up with the recommended type and grade of oil. The oil level check should be carried out after the engine has run for a few minutes: the dipstick plug <<A>> should be screwed fully home.
Oil change
The oil should be changed after the first 500,1500 km and every 5000
km thereafter. Change the oil when the engine is warm. Allow the sump to
drain fully before filling with new oil. <<A>> Oil filler plug with
dipstick (fig. 29) <<B>>.
Oil required: about 3,5 litres of -Agip 4T Super Racing SAE 20W/50-.
Washing the wire mesh filter (fig. 30A)
After the first 500÷1500 km, (first oil and filter cartridge change and then every 30.000 km it is recommended to remove the oil sump from the engine block, remove the wire mesh filter <<E>> and wash everything in petrol; then blow the filter with a compressed air jet. Don't forget to fit a new sump gasket when refitting the sump.
These operations are best carried out by an authorized dealer.
Checking the oil level
Check the oil level every 5000 km; the oil should just reach the level
plug hole <<B>>.
If the oil is below this level top up with the recommended grade and
type of oil.
Oil change
The gearbox oil should be changed every 10.000 km. Drain the oil when
the gearbox is warm as the oil is more fluid and drains more easily. Allow
the gearbox to drain fully before filling with new oil.
<<A>> Filler plug.
<<B>> Level plug.
<<C>> Drain plug.
Oil required: 0.750 litres of <<Agip Rotra MP SAE 8OW/90>>.
Checking the oil level
Check the oil level every 5000 km; the oil should just reach the level plug hole <<A>>. If the oil is below this level top up with the recommended grade and type of oil.
Oil change
The transmission box oil should be changed every 10,000km. Drain the
oil when the box is warm as the oil is more fluid and drains more easily.
Allow the box to drain fully before filling with new oil.
Rear transmission box lubrication (fig. 32)
<<A>> Level plug.
<<B>> Filler plug.
<<C>> Drain plug.
Oil required: 0.250 litres of which:
0.230 It. is <<Agip Rotra MP SAE 8OW/90>>;
0.020 It. is <<Agip Rocol ASO/R>> or <<Wolykote type <<A>>
Front fork oil change.
Change fork oil about every 15,000 km or at least once
a year. Amount of oil required: about 0,400 litres cartridge oil
<<MP suspension - REZ 71 (SAE 5)>>.
These operations are best carried out by an authorized dealer.
Greasing To grease: steering bearings; swinging arm bearings; control rod joints; side stand fittings; Articulated joints and needle bearing - rear driving box. Use: <<(Agip Grease 30)>>.
Greasing the driving shaft (fig. 33)
The vehicle has a driving shaft provided with greasers. The greasing operation of the 3 places shown in figure should be made every 2500 kms (every 1000 Km in case of continuous usage at high speed) or at least once a year if the number of kilometers is lower. Lubrication is recommended every time the motorbike is washed.
AGIP GREASE 30
AGIP GR LP2
ESSO LADEX 2
MOBIL PLEX 48
SHELL RHODINA GRIS 2
SHELL SUPERGRIS EP 2
After the first 5OOÖ 1500 km, and then every 5000 km or when the
valves are very noisy, check the clearance between the valves and the rockers.
This check is done on a cold engine, with the piston at top dead center
(T.D.C.) at the end of the compression stroke (valves fully closed).
Remove the rocker cover and proceed as follows:
1 Loosen nut <<A>>.
2 adjust screw <<B>> to set the following clearances, using a
feeler gauge <<C>>:
intake valve 0.10 mm; exhaust valve 0. 15 mm. Note that excessive clearance
causes noise, whereas with insufficient clearance the valves do not close
fully, causing: compression loss; engine overheating; valve burning, etc.
Timing belts (DAYTONA RS only)
Every 30,000 km replace the distribution timing belts. These operations are best carried out by an authorized dealer.
WEBER INJECTION-IGNITION SYSTEM (I.A.W.)
In the Weber injection-ignition system type "alfa/N" the engine speed and the throttle position are used to measure the quantity of sucked air; when the quantity of air is known, measure the fuel quantity in relation with the desired strength. Other sensors in the system allow to adjust the main operation, on particular condition. Moreover, the engine speed and the throttle angle allow to calculate the optimal ignition advance on every operation condition. The quantity of air sucked from each cylinder per cycle, depends on the air density in the suction manifold, on the single displacement and on the volume efficiency. The volume efficiency is experimentally calculated on the whole operation field of the motor (rpm and engine load) and is stored in the electronic unit. The control of the injectors, each cylinder, is 'lime-sequenced", i.e. the two injectors are controlled on the basis of the suction sequence, while the delivery can already begin, for each cylinder, from the expansion phase until the suction phase, already begun. The timing for the initial delivery is contained in the electronic unit.
Static inductive-discharge ignition with dwell control provided by the
power modules (in-built in the electronic box) and ignition advance mapping
stored in the electronic box. The coils receive the control inputs from
the I.A.W. unit (that calculates the ignition advance) via the power modules.
Description of the system Fuel circuit
The fuel is injected along the suction pipe of every cylinder, in the upper side of the suction valve. It includes: tank, pump, filter, pressure adjuster, electroinjectors.
Sucked air circuit
The circuit includes: air filter, suction pipe, floated casing.
The potentiometer for the throttle position is assembled on the throttle shaft.
The absolute pressure sensor is located on the filter casing and is connected to it by a hose so as to detect how pressure increases inside the filter casing because of the larger amount of air coming in through the two air vents. The pressure increase value is converted into an electric signal by the sensor and is used to change the pulse duration of the air/fuel mixture injection for optimum carburation.
The intake air sensor is located inside the fairing in the front section, so as not to be affected by engine heat.
Control circuit
With this circuit, the electronic unit detects the engine conditions and the performance of the fuel exhaust and the ignition advance. It includes: battery, ignition switch, two relays, electronic unit, ignition unit, max. pressure sensor, air temperature sensor, throttle position potentiometer, two injectors, oil temperature sensor, injection timing/RPM sensor.
Operation phases
Normal operation
When the engine is in standard thermic conditions, the I.A.W. unit calculates
the phase, the injection time, the ignition advance, only by interpolation
on the corresponding stored pre-settings, according to rpm and throttle
position. The resulting amount of fuel is delivered to the two cylinders
with two subsequent injections.
The count of the initial delivery moment, for each cylinder, is made
by means of a presetting that depends on the number of revolutions.
Starting phase
When the ignition switch is in operation, the I.A.W. unit feeds the
fuel pump for few time and detects the throttle angle and the temperature
of the engine.
After starting the engine, the unit receives the revolution and phase
signals, which allow it to control the injection and the ignition.
To make the starting phase easy, an enrichment of the main quantity,
upon the oil temperature, is performed. After the starting phase, the unit
begins the check of the advance.
Acceleration operation
During acceleration, the system increases the delivered fuel quantity,
in order to obtain the best way of guide. This condition is detected when
the throttle angle variation reaches appreciable values, the enrichment
factor is determined upon the oil and air temperatures.
Fuel cut (CUT-OFF) The release of the accelerator, on high rpm conditions,
is detected by the unit as deceleration intention; therefore, it is possible,
both for increasing the efficiency of the engine brake and for reducing
the consumption, to reduce the fuel delivery for a given period of time.
This condition is detected by means of the throttle position potentiometer
(throttle closed) and of the number of revolutions.
WARNING!
In order not to cause damages to the electronic ignition system, follow
the precautions hereunder: in case of battery removal or refitting, be
sure that the ignition switch is in position OFF do not disconnect the
battery with engine on; be sure of the perfect efficiency of earth cables
of electronic boxes; do not electric weld on the vehicle;
do not use other electric devices for starting;
to avoid either malfunctioning or inefficiencies of the ignition
system, the spark plug wire connections (spark plug cap) and the spark
plugs must be of the recommended type (as original equipment);
do not make any plug current check if the original spark plug cap
are not fitted otherwise the electronic power box would be irreparably
dam_ aged;
in case of assembling of antitheft devices or other electric devices,
absolutely do not touch the electric ignition/injection system. In the
electronic injection/ignition system is not possible to adjust the carburator
setting (air/gasoline ratio).
IMPORTANT!
Do not adjust the mechanical and electronic components in the electronic
injection/ignition system.
Any adjustment or maintenance work should be carried out at the dealer's
workshop.
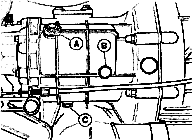
Adjusting the CO and the idle setting (fig. 35/35A)
To adjust the idling speed, turn the screw <<A>> on both throttle
bodies, using the appropriate vacuum gauge.
Recommended minimum rpm for both models: 1150÷1250 rpm.
N.B. - The idle setting should be adjusted when the engine is at running
temperature.
These operations are best carried out by an authorized dealer.
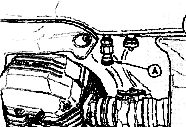
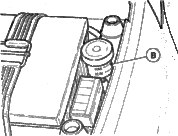
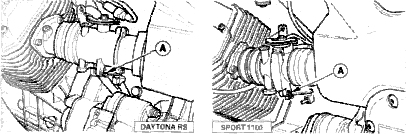
Changing the fuel filter (<<A>>) (fig. 36)
The filter is fitted with a paper filter element, with a surface of
approx. 1200 cm2, and a filtering power of 10 mµ; this is indispensable
as the injectors are highly sensitive to foreign bodies.
The filter is fitted under the petrol tank between the pump and the
throttle body unit and on the outer casing an arrow indicates the fuel
flow direction.
Every 10,000 km this filter should be changed.
To change the air filter, it is advised to use an authorized dealer.
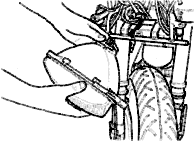
Changing the air filter (fig. 37)
Changing the air filter (fig. 38)
Changing the air filter (fig. 39)
Check the air filter every 5000 km and clean by blowing
with compressed air; change every 10.000 km.
This filter is mounted in a special case above the motor
group, remove the driver seat (see par. <<Driver seat
removal>> on page 50) and the fuel tank in order to get
access to it.
To remove the tank, proceed as follows:
- close the fuel cock <<B>> (see also page 42 fig. 8)
- disconnect the electric connections of the reserve
fuel warning light <<A>>;
- detach the fuel pipes from cock ,B,, and pressure
regulator <<C>>;
- unscrew the screw ,D,, and the screws ,E,, from
both sides;
lift the tank and disconnect the main breather tube.
These operations are best carried out by an authorized dealer.
Use the following types of spark plug: DAYTONA RS - NGK DR 9 EA SPORT
1100 - NGK BPR 6 ES Spark plug gap: 0.7 mm. Remove the spark plugs for
cleaning and checking at the intervals indicated in the Maintenance Schedule.
Refit the plugs by hand taking care not to cross thread them, they should
screw home easily; it is then recommended to tighten them manually for
some turns and to
use the provided suitable key, in order to check them when the engine
is cold. Even if used plugs appear to be in good condition, they should
be replaced every 10.000 km.
N.P. - Values lower than 0.7 mm can compromise the engine life.
The electrical equipment consists of the following:
Battery.
Starter motor with electro-magnetic ratchet.
Generator-alternator r f itted to the front of the crank-
shaft.
Fuel reserve signal device.
Light switch.
Ignition coil.
Electronic control unit I.A.W.
Injection timing/rpm sensors.
Voltage regulator.
Fuse box (no. 6, 15 A fuses).
Electronic box remote control switch.
Pump-coil-injection remote control switch.
Starter switch.
Headlight.
Tall light.
Direction indicators.
Emergency flasher switch.
Selector indicators.
Light direction indicator, horn and headlamp flasher
switch.
Blinker unit.
Starter and stop device.
Bitonal horn.
Warning lights on instrument panel for: neutral indi-
cator (green), side lights on (green), oil pressure
(red), main beam (blue), generator (red), fuel re-
serve (orange), direction indicators (green).
Battery
The battery has a voltage of 12V and a capacity of 12 Ah; it is charged by the generator. To reach the battery, remove the passenger seat.
This is hermetic battery (maintenance f ree) that do not require the control of the electrolyte level or any topping up.
Recharging
To recharge the battery, use 1.5 A current intensity and 13.5Ö 13.8 V.
NOTE: This operation should be carried out in a ventilated room. Avoid sparks, bare flames and do not light cigarettes in proximity of the battery.
Replacing bulbs
To replace the headlamp, remove the body cover, remove the headlight, disconnect the electrical leads, remove the rubber protective cap and detach the bulb by turning the securing ring nut.
N.B. -when changing the headlight bulb (main/ dipped beams) take care not to touch the glass part of the bulb with the fingers.
The lamp holder, complete with side light bulb, is pushfitted.
PICTURE
Tachometer, speedometer, rev counter, pilot lights Remove the front fairing, extract the lamp support and replace the bulbs.
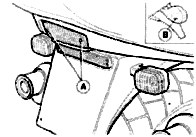
Unscrew the screws <A,, securing the reflector, press the bulb firmly in and twist it to remove it from the lampsocket.
Indicator lights (fig. 42)
Unscrew the screws <<B>> that fasten the reflectors to the turn indicators, press the bulbs inwards by rotating them, and extract them from the lamp-holders.
N.B. - Never tighten too much the screws fastening the reflectors, to avoid breaking them.
Adjusting the headlight beam (fig. 43)
The headlight beam should always be kept adjusted to the correct height to ensure good visibility and to avoid dazzling oncoming traffic. For vertical adjustment, turn screw <<A>> and move the light up or down as required.
Bulbs
Headlight:
Dipped and main beam 60/55 W
Side/parking lights 3 W
Tall light:
Number plate, stop light 5/21 W
Direction indicators low
Speedo, rev counter lights 3 W
Instrument panel warning lights 2 W
A little note about the following links. Clicking on the illustration will return you to this area. Clicking on the sub-title will take you back to the applicable section of the manual.
Identification data (fig. 2)
Control panel (fig. 3)
Horn Button, Headlamp Flash
direction indicators (fig. 4)
Starter Button and Engine Switch
(fig. 5)
Gearbox control pedal (fig.
6)
Fuel filler Cap (fig.7)
Fuel tap (fig. 8)
Fuse box (fig. 9)
Fuses (fig. 9a)
Steering damper (fig. 10)
Documents and objects holder
(fig. 11)
Helmet holder (fig. 12)
Motorbike lateral supporting
arm (fig. 13)
Driver seat removal (fig. 14)
Adjusting the clutch lever
(fig. 15)
Adjusting the front brake lever
(fig. 16)
Rear brake pedal adjustment
(fig. 17)
Front brake reservoir (fig.
18)
Rear brake reservoir (fig.
19)
Adjustment of telescopic fork
(fig. 20)
Accessing the rear shock adjuster
(fig. 21)
Rear shock ring nut (fig. 22)
Rear shock hydraulic damper
(fig. 23)
Rear shock spring pre-loading
(fig. 24)
Adjusting the steering (fig.
25)
Front wheel (fig. 26)
Rear wheel removal (fig. 27)
Joint unit position diagram
(fig. 28)
Engine lubrication (fig. 29)
Oil drain plug (fig. 30)
Washing the wire mesh filter
(fig. 30A)
Gearbox lubrication (fig. 31)
Rear transmission box lubrication
(fig. 32)
Greasing the driving shaft
(fig. 33)
Valve clearance (fig. 34)
Adjusting the CO and the
idle setting (fig. 35/35A)
Changing the fuel filter
(<<A>>) (fig. 36)
Changing the air filter (fig.
37)
Changing the air filter (fig.
38)
Changing the air filter (fig.
39)
Spark plugs (fig. 40)
Headlight (fig. 41)
Rear light (fig. 42)
Adjusting the headlight beam
(fig. 43)